1. install Audible manager and Audible download manager with Wine. These programs can be found in software section on Audible sites.
2. Download audible download script, which originally posted at Ubuntu forum by mndzmyst. Open the file with text editor, and change the home folder to your user name.
3. After select the file type on Audible site, download a download bait file, which has .pl extension. Open the .pl download bait file with the script. Download will be started, after it's done, you can listen to the file with Audible manager.
Wednesday, November 17, 2010

enjoy DOS games with DOSbox
1. Install dosbox with aptitude
2. Open /home/username/.dosbox/dosbox-0.73.conf and add under [autoexec] (which is at the end)
3. browse to the game folder in dosbox. play and enjoy.
- In case of an error-message saying ,
- For [mixer], this setting I found good:
- For DOS games like Ultima series, abandonia is a very good site.
2. Open /home/username/.dosbox/dosbox-0.73.conf and add under [autoexec] (which is at the end)
mount c /where/dosgames/folder

c:
3. browse to the game folder in dosbox. play and enjoy.
- In case of an error-message saying ,
you need csdpmi*b.zip, download cwsdpmi.zip and extract it in the game folder.- For [mixer], this setting I found good:
nosound=false

rate=48000

blocksize=256

prebuffer=50
- For DOS games like Ultima series, abandonia is a very good site.
LaTeX with JabRef and use Havard bibliography style (and where to put those TeX .bst files and .sty files)
1. Go to the JabRef database folder and put .bib extension after the database filename, in case there is no extension designated.
2. Make a symbolic link for the bibliography database file.
Then, put the symbolic link in
3. Extract harvard bibliography style zip file, which is downloadable at CTAN page. Put all the .bst(bibliography style) files in
4. In preambule, put
5. Put, before
We're done. Compile! latex-bibtex-latex-latex.
2. Make a symbolic link for the bibliography database file.
ln -s ~/foldname/of/JabRef-database-folder/ bibThen, put the symbolic link in
/home/username/texmf3. Extract harvard bibliography style zip file, which is downloadable at CTAN page. Put all the .bst(bibliography style) files in
/home/username/texmf/bibtex/bst and .sty files in /home/username/texmf/tex/latex/my_styles4. In preambule, put
\usepackage{harvard} and \bibliographystyle{agsm} right after \begin{document}.5. Put, before
\end{document},

\addcontentsline{toc}{chapter}{Reference}

\bibliography{/home/username/texmf/bib/filename-without-.bib-extension}
We're done. Compile! latex-bibtex-latex-latex.
Monday, November 8, 2010
Sync iPhone, iPod Touch with Rhythmbox on Ubuntu
Original reference at seadao's comment on Ubuntu Forum.
1: Jailbreak your device install OpenSSH from cydia
2: Change the value of the key 'DBVersion' in /System/Library/Lockdown/Checkpoint.xml (make a backup first!) to 2 (original instruction)
3: Find (/var/mobile/media) itunes_control, and delete it along with all the sym links ex: ipod_control .... if they exist (note an empty itunes_control will be created by firmware, it's a good idea to reboot the device after this)
4: use itunes in windows (i used virtual box NOT OSE, you need usb support), upload 1 mp3 file to the ipod, this will create the new DB
5: install
6: use make install(NOT CHECKINSTALL cmake in not debian rules) to compile usbmuxd from git
Just to add, I jailbroke my iphone 3gs, ios 4.1 with redsn0w for the access to root. Banshee didn't even show iphone connected, while rhythmbox showed it. Rhythmbox gave an error when I attempted to copy a song into iphone. I was sshed into the iphone at that time, so I disconnected. I exited rhythmbox, and ran it again; retried; it worked flawlessly.
1: Jailbreak your device install OpenSSH from cydia
2: Change the value of the key 'DBVersion' in /System/Library/Lockdown/Checkpoint.xml (make a backup first!) to 2 (original instruction)
3: Find (/var/mobile/media) itunes_control, and delete it along with all the sym links ex: ipod_control .... if they exist (note an empty itunes_control will be created by firmware, it's a good idea to reboot the device after this)
4: use itunes in windows (i used virtual box NOT OSE, you need usb support), upload 1 mp3 file to the ipod, this will create the new DB
5: install
libimobiledevice from ppa:pmcenery/ppa6: use make install(NOT CHECKINSTALL cmake in not debian rules) to compile usbmuxd from git
git clone git://git.marcansoft.com/usbmuxd.git

cd usbmuxd

mkdir build

cd build

cmake ..

make

sudo make install Just to add, I jailbroke my iphone 3gs, ios 4.1 with redsn0w for the access to root. Banshee didn't even show iphone connected, while rhythmbox showed it. Rhythmbox gave an error when I attempted to copy a song into iphone. I was sshed into the iphone at that time, so I disconnected. I exited rhythmbox, and ran it again; retried; it worked flawlessly.
Make wine program as a default program
This instruction is taken from Ubuntu Wine documentation. I use this to link PDF files to PDF-XChange (,which work flawlessly with PDFs to highlight, comment, bookmark, etc). Note that portable version didn't work with this method.
Creating file associations
If you want certain files to open in a windows application by clicking on them, the best way is to create a script. For example I want Adobe Flash project files (*.fla) to open in Adobe's Flash editor if I double click it.
You can for example create a file using this terminal command.
gedit ~/.wine/Flash\ 8
Now paste the following example script in it, save and close gedit.
Example script:
Make sure the file is executable with this command.#!/bin/sh
QUICKPARLOCATION="c:\\Program Files\\Macromedia\\Flash 8\\Flash.exe"
PARAM=`winepath -w "$*"`
wine "$QUICKPARLOCATION" "$PARAM"
exit 0
chmod +x ~/.wine/Flash\ 8
After you completed this go to an *.fla file right click it, properties, go to the “open with” pane, click add, add this line into your terminal and select the radio button.
'/home//.wine/Flash 8'
Now if everything went ok, you can doubleclick the file and it will be openend in Flash 8.
Friday, November 5, 2010
VirtualBox harddrive file (.vdi) seems never shrink, whatever I do in the guest windows. We can fix this. Following is taken from http://kakku.wordpress.com.
For the reference, disk space can be also managed by turning off indexing, logging, restoring, and virtual memory. Also windows have a one stop cleaning center, which can be accessed by right clicking on the disk drive in the explorer.exe.
For the reference, disk space can be also managed by turning off indexing, logging, restoring, and virtual memory. Also windows have a one stop cleaning center, which can be accessed by right clicking on the disk drive in the explorer.exe.
We’ll need the following tools:
1. http://www.feyrer.de/g4u/nullfile-1.02.exe : This tool zeroes out free space, which our next tool compresses. For Linux based OS, search for a file, zerospace.c, which you’ll have to compile yourself.
2. VBoxManage : This tool is the command line management tool that ships with VirtualBox. Whatever you can do with the GUI, can be done by this. + A lot more
Ok now.
1. First boot into your VM. Defragment your drive atleast 2 times.
2. Copy the tool, nullfile mentioned above to the VM and run it. A simple double click should do it.
3. Now shutdown the guest. Open a terminal in the VM image directory. Most probably /home/_user_name_/.VirtualBox/VDI
4. Run our final command, We would be done after this.
VBoxManage modifyvdi _file_path_ compact
e.g. in my case I ran: VBoxManage modifyvdi /media/Blockk/VDI/NewHardDisk1.vdi compact
Wednesday, November 3, 2010
Uninstalled some program? Afraid of remaining dependencies? Clean them!
- To uninstall, check with 'completely uninstall' in Synaptic. You can review if anything undesired will be deleted.
- After uninstall, run
- Then run
Cleaned!
Check out this article to better understand.
- After uninstall, run
sudo apt-get autoremove- Then run
sudo apt-get clean.Cleaned!
Check out this article to better understand.
Connect with iPhone over WiFi
1. You need a jailbroken iPhone, OpenSSH installed.
2. Get
3. In Users and Groups under Ubuntu's administrations section, make sure you are a member of "fuse" group.
4. Connect your iPhone with USB cable. This is needed only once.
5. run
6. Rebooting is highly recommended.
Check out Lifehacker's guide!
2. Get
ipod-convenience from here, and install it. You will be prompted to enter iPhone's IP address and the desired mount point.3. In Users and Groups under Ubuntu's administrations section, make sure you are a member of "fuse" group.
4. Connect your iPhone with USB cable. This is needed only once.
5. run
iphone-mount. Check the file manager if it is mounted. To unmount, iphone-umount.6. Rebooting is highly recommended.
Check out Lifehacker's guide!
Saturday, October 30, 2010
Make a slideshow wallpaper (background) easily
It can be annoying to manipulate a xml file to make a slideshow background. Here is a hassle-free solution: XML animated background creator. Just put
xmlback file in the archive in /home/username/.gnome2/nautilus-scripts. Now gather images to make a slideshow background in a folder, and open the folder in Nautilus, and run the script from the context menu. Tada~ It's done!
Friday, October 29, 2010
Transform your Linux XWindow into Windows 7 look
OK, I am still a Mac guy and if I can transform my xwindow into Mac OS X look super simply like I can do with Win2-7 Pack 6.0 Multilang Aero!, I will do it. I tried several theme packs for Mac OS X look, they are either very ugly or too complicated. Interestingly, it seems people are more interested in Windows 7 look. It is quite pleasant to see, I agree, and I think it should be so as Microsoft must invest a lot of money to develop the look. So here I go, I gave a try, and it actually looks better to my eyes than many Linux themes out there. Given the simplicity of the installation process (and update or uninstallation process, even though I haven't tried), they must made a lot of effort in the project. I appreciate it!!!
When Baldur's Gate II stuck in the splash screen, in the middle of the game, so on
I find Baldur's Gate II under Wine have a slight problem with my soundcard sometimes.
I tried
I tried
killall pulseaudio and most of time problem solved.
How to get rid of (or put) desktop, trash can, home folder icons from Desktop
*This can also be done with Ubuntu Tweak application.
I got this from here.
I got this from here.
we need to get it one on the desktop. For this, we will be using the Configuration Editor. Open the Run Application window (Alt+F2) and enter gconf-editor. Click Run.
Using the Gnome Configuration Editor
To me, the gconf-editor looks a bit like the registry editor under Windows. In the left pane, click the arrow in front of apps to drop down the hidden options. A listing of applications on your system will appear. The one we are interested in is nautilus. Click the arrow in from of nautilus to show the options there and you should see one labeled desktop. Click desktop.
In the right pane, you will see options for adding the trash can icon to the desktop. Also available are the icons for the computer, home folder and network. Placing a check mark for the icon_visible option for any of these items will place the icon on the desktop. Additionally, you can name these items anything you desire. As a side note, you can always rename the icons directly from the desktop by right clicking the item and choosing Rename...
When you are done making your choices in the Configuration Editor, close the window. That is all there is to getting those icons you have grown to love on the desktop.
Sunday, October 17, 2010
How to show all the USB devices dimmed in grey in VirtualBox
Grabbed this from here.
Basically, with setting up correct user group, all the dimmed devices come back to be ready. No.2 concerns iPhone and iPod Touch because it has a problem in connection in recovery mode.
For making VirtualBox work with iTunes, see this page.
1. Setup correct user group
Try this:
1. In the host (10.04 Lucid), System->Administration->Users and Groups
2. Click Manage Groups.
3. In the Groups settings List Box, navigate down to vboxusers
4. With vboxusers high lighted, click properties
5. Click the check box next to your user name to indicate you want you to be a member of the vboxusers group.
reboot the host.
2. Created a USB filter in VBOX, cleared all of the fields except for the "Vendor ID" field.
Basically, with setting up correct user group, all the dimmed devices come back to be ready. No.2 concerns iPhone and iPod Touch because it has a problem in connection in recovery mode.
For making VirtualBox work with iTunes, see this page.
1. Setup correct user group
Try this:
1. In the host (10.04 Lucid), System->Administration->Users and Groups
2. Click Manage Groups.
3. In the Groups settings List Box, navigate down to vboxusers
4. With vboxusers high lighted, click properties
5. Click the check box next to your user name to indicate you want you to be a member of the vboxusers group.
reboot the host.
2. Created a USB filter in VBOX, cleared all of the fields except for the "Vendor ID" field.
Saturday, October 16, 2010
A driver and GUI for Nike+ Sportband
ps2.
Interesting enough, I tried VirtualBox with USB setting, and it works just fine. But the information was as comsport suggested, so there might be some relation anyway? I wonder, if I need the driver at all, and I think I can just put the information in VirtualBox usb setting by myself.
ps1.
I just found it doesn't run correctly. The error message:
username$ comsport -h
*** stack smashing detected ***: comsport terminated
Segmentation fault
Googled the error message, but I don't know what to do! Can this be a problem caused by checkinstall???
I found a candidate for the solution here:
"I have been dealing with the stack smashing issue for a while with nvclock. I finally was able to compile a version of nvclock 0.8b2 with the "-fno-stack-protector" cflag that works for me every time. I did this by running the configure script and then manually editing all of the Makefile's in the tree and adding "-fno-stack-protector" (without the quotes) to all of the CC= lines."
I haven't dealt with this kind of thing. I'll wait some time to do this. This is quite tiring...
-----------------------
Nike+ Sportband is a good device for tracking jogging, but unfortunately, Nike seems not interested to make a Linux driver. But we have an alternative user made driver, you can grab the driver,
"Consider adjusting the PKG_CONFIG_PATH environment variable if you installed software in a non-standard prefix." I really don't know what was the problem, but I googled the error message and found the problem was not for the program which designated by the error but the developer package for the program (the name of the package will be "
The best way to solve your problem is:
sudo -s
apt-get update
apt-get install build-essential
apt-get install libusb++-dev
apt-get install libusb-dev
tar -xzf file.tar.gz
./configure
make
make install
now copy file 90-sportband.rules to /etc/udev/rules.d/
restart udev or reinit your pc.
now you have installed your driver.
The GUI needs Java Runtime, do:
apt-get install sun-java6-jre
You can run de GUI doing: java -jar file.jar
Interesting enough, I tried VirtualBox with USB setting, and it works just fine. But the information was as comsport suggested, so there might be some relation anyway? I wonder, if I need the driver at all, and I think I can just put the information in VirtualBox usb setting by myself.
ps1.
I just found it doesn't run correctly. The error message:
username$ comsport -h
*** stack smashing detected ***: comsport terminated
Segmentation fault
Googled the error message, but I don't know what to do! Can this be a problem caused by checkinstall???
I found a candidate for the solution here:
"I have been dealing with the stack smashing issue for a while with nvclock. I finally was able to compile a version of nvclock 0.8b2 with the "-fno-stack-protector" cflag that works for me every time. I did this by running the configure script and then manually editing all of the Makefile's in the tree and adding "-fno-stack-protector" (without the quotes) to all of the CC= lines."
I haven't dealt with this kind of thing. I'll wait some time to do this. This is quite tiring...
-----------------------
Nike+ Sportband is a good device for tracking jogging, but unfortunately, Nike seems not interested to make a Linux driver. But we have an alternative user made driver, you can grab the driver,
comsport, here. Besides I had to install a dependency, i encountered following error for another dependency:"Consider adjusting the PKG_CONFIG_PATH environment variable if you installed software in a non-standard prefix." I really don't know what was the problem, but I googled the error message and found the problem was not for the program which designated by the error but the developer package for the program (the name of the package will be "
theprogramname-dev").Following instruction is taken from here. (I recommend to use
aptitude than apt-get, and checkinstall than make install.)The best way to solve your problem is:
sudo -s
apt-get update
apt-get install build-essential
apt-get install libusb++-dev
apt-get install libusb-dev
tar -xzf file.tar.gz
./configure
make
make install
now copy file 90-sportband.rules to /etc/udev/rules.d/
restart udev or reinit your pc.
now you have installed your driver.
The GUI needs Java Runtime, do:
apt-get install sun-java6-jre
You can run de GUI doing: java -jar file.jar
Wednesday, October 6, 2010
Actually it is great to watch BBC iPlayer on Linux
Yes, with
1) Install
2) Go to iPlayer webpage and find out what you want to watch.
3) Open a terminal window, type
4)
*without parenthesis
5) It will download the show. For me, if I use the same proxy server, which is free and slow, on iPlayer site, it takes forever to download. But with
get-iplayer, it is now easy to watch BBC shows hosted in iPlayer. This is a quick how-to.1) Install
get-iplayer.2) Go to iPlayer webpage and find out what you want to watch.
3) Open a terminal window, type
get-iplayer "title of the show", it will give you its PID.4)
get-iplayer --proxy=http://(proxy.address.if.you.use.any) --verbose --get (PID) --output "(/download/folder/)"*without parenthesis
5) It will download the show. For me, if I use the same proxy server, which is free and slow, on iPlayer site, it takes forever to download. But with
get-iplayer, it's a breeze!More detailed explanation can be consulted using
get-iplayer --help or visit get-iplayer page.Thursday, September 9, 2010
Record sound playing on the computer
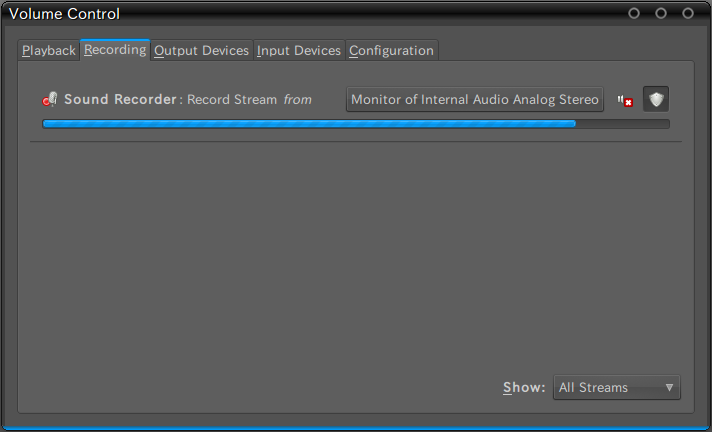
Such a perfect timing, I was exactly looking for how to record sound playing on the computer. I tried gnome-sound-recorder, but it didn't show sound input drop-down, so all I can record was from the internal mic. Not anymore! I found the information at Ubuntu Weekly Recipe 技術評論社: "第137回 PulseAudioを活用する". The solution is using PulseAudio.
Steps:
1. Install
2. Run gnome-sound-recorder.
3. Push the record button. Now go to pavucontrol, and see the Playback tab. You will see "Record stream from". Choose "Monitor from analog stereo" from the drop-down menu on the right.
4. Good to go!
Steps:
1. Install
pavucontrol. (aptitude or synaptics) This is GUI PulseAudio volume control frontend.2. Run gnome-sound-recorder.
3. Push the record button. Now go to pavucontrol, and see the Playback tab. You will see "Record stream from". Choose "Monitor from analog stereo" from the drop-down menu on the right.
4. Good to go!
PulseAudio Volume ControlでのRecording tab (image from the same page)
Install Epson GT-S620 scanner driver
from Ubuntu Weekly Recipe:第125回 Simple ScanとXournalで電子書類を扱う|gihyo.jp … 技術評論社: "GT-S620を接続する":
SANEプロジェクトのページを見るとわかるように,GT-S620はAVASYSが公開しているドライバを別途インストールしておく必要があります。しかし,GT-S620は一般ユーザ権限でデバイスを使用することができません。これはAVASYSのドライバがサポートしているスキャナが接続された場合に,/lib/udev/rules.d/40-iscan.rulesの中で,以下の設定がなされることに起因します。
ENV{iscan_matched}="yes"通常のlibsaneがサポートしているスキャナであれば,/lib/udev/rules.d/40-libsane.rulesの中で以下の設定がなされます。ENV{libsane_matched}="yes"iscan_matchedとlibsane_matchedの違いがどこに影響するかというと,/lib/udev/rules.d/70-acl.rulesの中の以下の部分です。# USB scanners ENV{libsane_matched}=="yes", ENV{ACL_MANAGE}="1"このように,libsane_matchedがyesになっていればACL_MANAGEが1になり,結果として /dev 以下に作成されるキャラクタスペシャルファイルに一般ユーザでアクセスができるのですが,AVASYSのドライバによって認識されたスキャナはこの部分にマッチしないため,一般ユーザでの使用ができなくなっています。そこで上記該当部分にENV{iscan_matched}=="yes", ENV{ACL_MANAGE}="1"などと追記することで,一般ユーザ権限でAVASYSのドライバを経由したスキャンが可能になります。
Upgrade / Downgrade your Dell Bios On Ubuntu by bigbrovar
A very simple guide to Dell laptop Bios upgrade from:
Upgrade / Downgrade your Dell Bios On Ubuntu by bigbrovar
I also found this on linux.dell.com troubleshooting page:
I haven't yet tried downgrading.
Upgrade / Downgrade your Dell Bios On Ubuntu by bigbrovar
Updating or Downgrading your Bios is pretty straight forward on Ubuntu. Ok maybe not as straight forward as double clinking to install. But not that difficult all the same.
for this guide we will be using the commandline. But that should not scare you, i have tried to make the guide as easy as possible. first we open Terminal/Application/Accessories/Terminal
Now since we will be running every command as root(as administrator), we sould need to become an admin. so that we wont need to been adding sudo infront of every command. so first copy and paste this in terminal
sudo bashhit enter and give your passwd.you will see your prompts change from
this :~$ to :~#Then we need to install Libsmbios a linux package in the Ubuntu repositories.apt-get install libsmbios-binonce installed we need to get the system ID to get hat run this in terminal
getSystemIdyou should get an output that looks like thisSystem ID: 0x0209
Service Tag: 4MV9HH1
Express Service Code: 10089895861
Product Name: XPS M1330
BIOS Version: A14
Vendor: Dell Inc.
Is Dell: 1from the above output my system ID is 0×0209. Armed with this information you now need to get the BIOS version want to upgrade / downgrade. you can get it from here.http://linux.dell.com/repo/firmware/bios-hdrs
Scroll down the list to find a directory matching the System ID from the previous step. and look for the bios version that you want to upgrade/downgrade to In my case my directory is named: system_bios_ven_0x1028_dev_0x0209_version_a14/ my system ID IS0×0209 and the version of bios i wanted was A14.
Go into this directory and download the file, “bios.hdr” and save it in your desktop.Now we load the load the dell_rbu drivermodprobe dell_rbuFor Updatingnow to update the bios we move into the directory were we saved the bios.hdr file. if you saved it in your desktop. just do thiscd $HOME/DesktopPLEASE MAKE SURE YOUR SYSTEM IS PLUGGED TO A POWER SOURCE AND NOT ON BATTERY.Then we run the update command.dellBiosUpdate -u -f ./bios.hdrif all goes well you would see the following feedbackSupported RBU type for this system: (MONOLITHIC)
Using RBU v2 driver. Initializing Driver.
Setting RBU type in v2 driver to: MONOLITHIC
Prep driver for data load.
Writing RBU data (4096bytes/dot): ............................
..............................................................
.......................
Notify driver data is finished.
Activate CMOS bit to notify BIOS that update is ready on next boot.
Update staged sucessfully. BIOS update will occur on next reboot.
I also found this on linux.dell.com troubleshooting page:
make sure to do a soft reboot (not a power-cycle) after the update (shutdown -r 0)Also, in my case, the upgrading message was very simple. It worked just fine anyway. (from A12 to A17)
If you are Downgradingfor downgrading to a previous BIOS version.your downgrade command would bedellBiosUpdate --override_bios_version -u -f ./bios.hdrNow that you are done updating /downgradingwe would need to tell the system to do a cold reboot which is what is needed after doing a bios update.to do this we would need to edit the kernel line in your menu.lstrun this in terminalgksu gedit /boot/grub/menu.lst
look for the kernel linetitle Ubuntu 8.10, kernel 2.6.27-9-generic
uuid f5e0a891-61ec-434a-b935-78bc25b1542e
kernel /boot/vmlinuz-2.6.27-9-generic root=UUID=f5e0a891-61ec-434a-b935-78bc25b1542e ro quiet splash
initrd /boot/initrd.img-2.6.27-9-genericand add reboot=bios to the end of the kernel line to look like thistitle Ubuntu 8.10, kernel 2.6.27-9-generic
uuid f5e0a891-61ec-434a-b935-78bc25b1542e
kernel /boot/vmlinuz-2.6.27-9-generic root=UUID=f5e0a891-61ec-434a-b935-78bc25b1542e ro quietreboot=bios splash
initrd /boot/initrd.img-2.6.27-9-genericsave and close the text editornow you can reboot your machineonce the system restart it would display a white screen which some messages displaying what its doing. and your bios boot splash might take a while. but that is fine.once restarted. be sure to remove the “reboot=bios” from your kernel line.
I haven't yet tried downgrading.
Thursday, September 2, 2010
Mount and Unmount ISO images
In the basic setting, ubuntu can browse iso files, but it doesn't mount them under /media. This can be a problem when install softwares, especially under wine. The following is quoted:
I am taking this tip from here first you need to download two scripts for mount iso images download from here for unmount iso images download from here
Once you have these two scripts you need to change the permissions using the following commands
sudo chmod +x /home/username/mount.sh
sudo chmod +x /home/username/unmount.sh
Now you need to copy them nautilus scripts
sudo mv /home/username/mount.sh ~/.gnome2/nautilus-scripts/
sudo mv /home/username/unmount.sh ~/.gnome2/nautilus-scripts/
That’s it now you are ready for mounting and unmounting your ISO images.
from Debian Admin
Then use script context menu in nautilus. If you have an error message, check your file name and folder names where your file is set. Make sure there is no space in the names!
Friday, August 27, 2010
On/Offline dictionary for Linux:GoldenDict
Even though there is a dictionary application for Linux, it only works online for default. It is possible to make it work offline with "dictd", but still its use is limited, as it can't show a pop-up window in other application.
I recommend GoldenDict. It works with many other dictionary formats. Moreover, it has a "snap windows function", which calls a pop-up windows with the definition. It can be used with many dictionary data files, and also with online dictionaries and wikipedia.
Subscribe to:
Posts (Atom)